1 Introduction
MediBook v1.4 is an application that functions as an advanced logbook for use in the healthcare industry. It allows healthcare professionals to keep track and sort patients’ details, record patients’ appointments.
This Developer Guide is intended for users with basic technical background as it details the setting up of our application, the design of our software architecture, describe the implementation of our key features, and the testing involved in our software. Appendix includes user stories and use cases for reference.
2 Setting up
Prerequisites
-
JDK 9 or later
-
IntelliJ IDE
Importing the project into IntelliJ
-
Open IntelliJ (if you are not in the welcome screen, click
File>Close Projectto close the existing project dialog first) -
Set up the correct JDK version
-
Click
Configure>Project Defaults>Project Structure -
If JDK 9 is listed in the drop down, select it. If it is not, click
New…and select the directory where you installed JDK 9 -
Click
OK
-
-
Click
Import Project -
Locate the
build.gradlefile and select it. ClickOK -
Click
Open as Project -
Click
OKto accept the default settings -
Run the
seedu.addressbook.Mainclass (right-click theMainclass and clickRun Main.main()) and try executing a few commands -
Run all the tests (right-click the
testfolder, and clickRun 'All Tests') and ensure that they pass -
Open the
StorageFilefile and check for any code errors-
Due to an ongoing issue with some of the newer versions of IntelliJ, code errors may be detected even if the project can be built and run successfully
-
To resolve this, place your cursor over any of the code section highlighted in red. Press ALT+ENTER, and select
Add '--add-modules=java.xml.bind' to module compiler options
-
3 Design
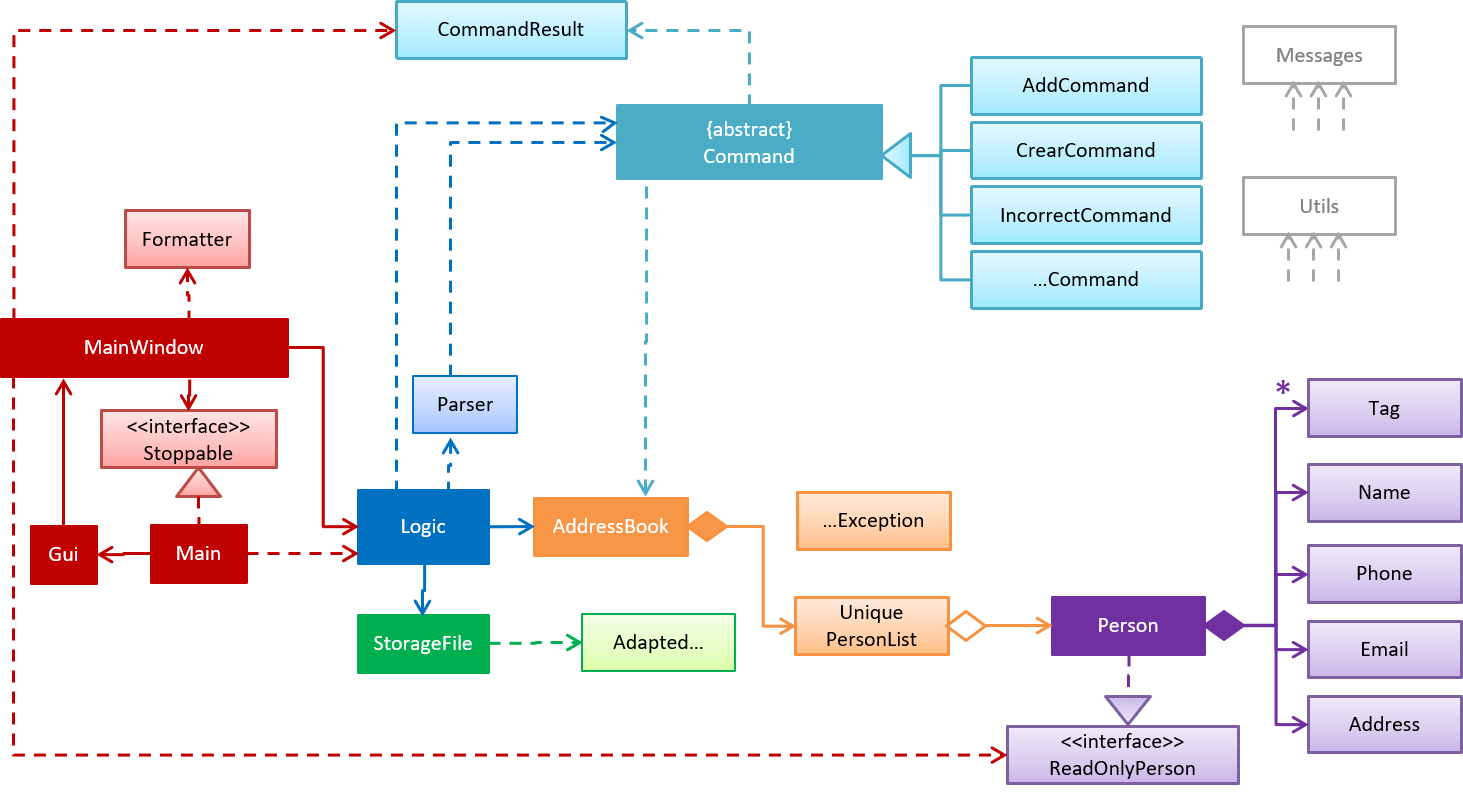
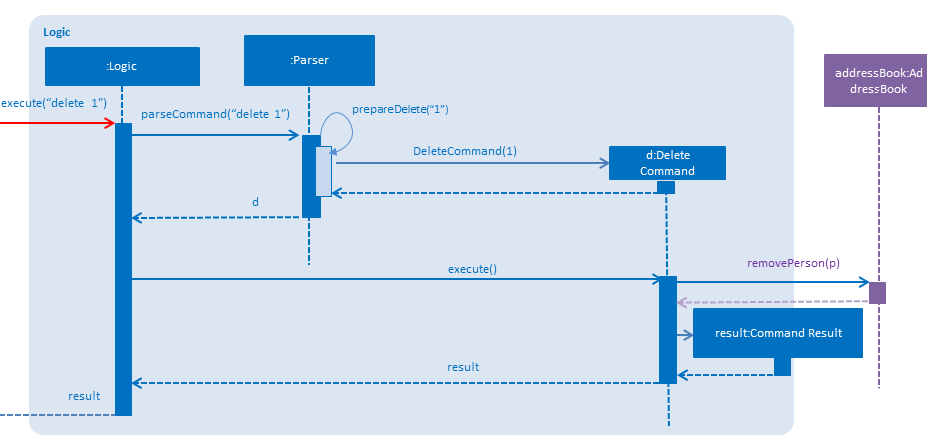
3.3 Logic Component
Class diagram for the Logic Component:
Sequence diagram when a command is called (in this example, "delete 1") :
3.4 Storage Component
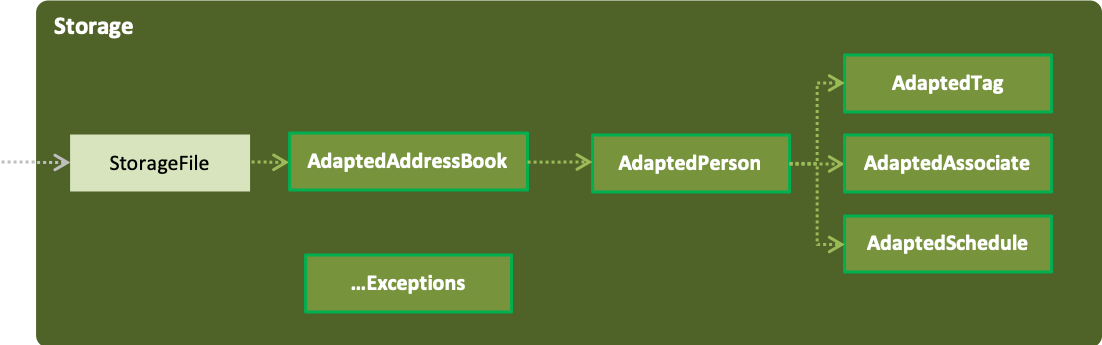
The storage component stores MediBook data in an XML format and is able to translate it back into a human-readable format in MediBook
4. Implementation
This section describes some noteworthy details on how certain features are implemented.
4.1 State control (undo/redo)
The state control feature allows the user to manipulate the different states of the MediBook in the current session with the undo and redo command. This section will describe the implementation of this feature.
4.1.1 Current implementation
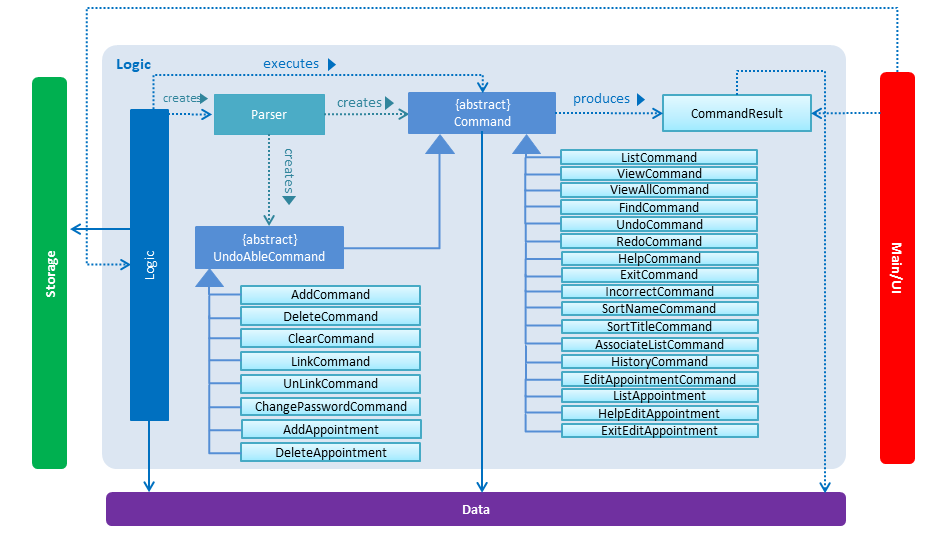
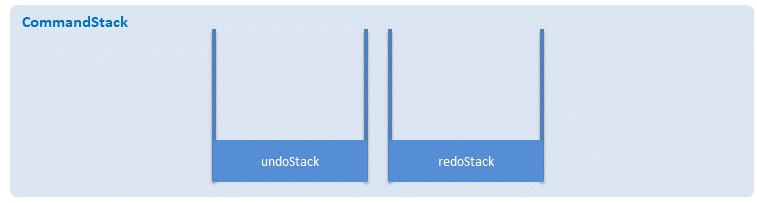
The state control mechanism is managed by the CommandStack class. It supports the undo-ing and redo-ing of commands that modifies the contents of the MediBook in the current session.
These commands will extend from UndoAbleCommand instead of Command. These commands are then managed by the undoStack and the redoStack.
The following diagram shows the inheritance diagram for commands:

Commands that inherits from Command are implemented this way:
public class FindCommand extends Command {
    @Override
    public CommandResult execute() {
        //Find Logic
    }
    //...more code...
}
On the other hand, commands that inherit from UndoAbleCommand are implemented this way:
public class ClearCommand extends UndoAbleCommand {
    @Override
    public CommandResult execute() {
        //Clear Logic
    }

    @Override
    public void executeUndo() {
        //Logic to undo clear
    }

    @Override
    public void executeRedo() {
        //Logic to redo clear
    }
    //...more code...
}
As shown, the commands that extends from the UndoAbleCommand will need to know how to undo and redo the changes they have made. This requires the object to store information of the change made. For example the DeleteCommand object will need store the person that was deleted so that the change made can be undone.
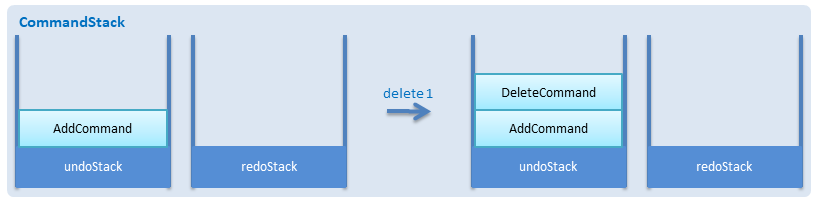
Below is an example usage scenario and the behaviours of the component at a given time:
1. On start-up:
CommandStack will be initialised with an empty undoStack and redoStack.
2. User executes a command that make changes to the MediBook (e.g add John Doe…):
The add command will do a`commandStack.checkForAction()` and subsequently addCommandToStack() which adds the AddCommand object into the undoStack.

commandStack.checkForAction() will only be called if the command has been executed successfully. If it fails its execution, the object will not be pushed into the undoStack.
|
3. User executes another command that make changes to the MediBook (e.g delete 1):
The same procedures as step 2 applies and the new DeleteCommand will be pushed into the undoStack on top of the previous AddCommand object.
4. User wants to undo the change they just made and executes the undo command:
The undo command calls commandHistory.undoLast() which will get the object at the top of the undoStack, call its executeUndo() method, push it into the redoStack and then remove it from the undoStack.
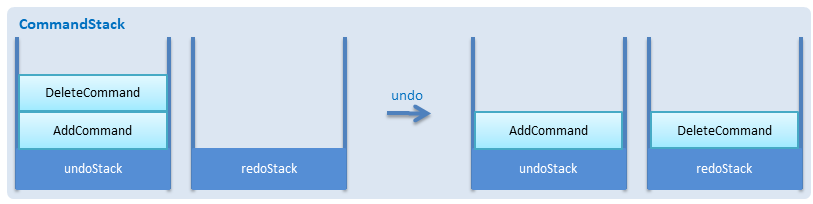
If the user execute undo command when the undoStack is empty, the undoLast() method will throw a HistoryOutOfBoundException() which will be caught in the UndoCommand class and will display an error to the user instead.
|
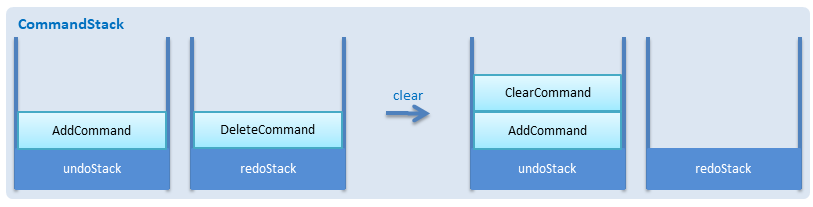
5. User executes another command that make changes to the MediBook after the undo (e.g clear):
The clear command calls commandStack.checkForAction() which determines that this command was made following an undo command and therefore requires truncateOldPath() to be called. In this case, the redoStack will be cleared before the ClearCommand object is pushed into the undoStack.
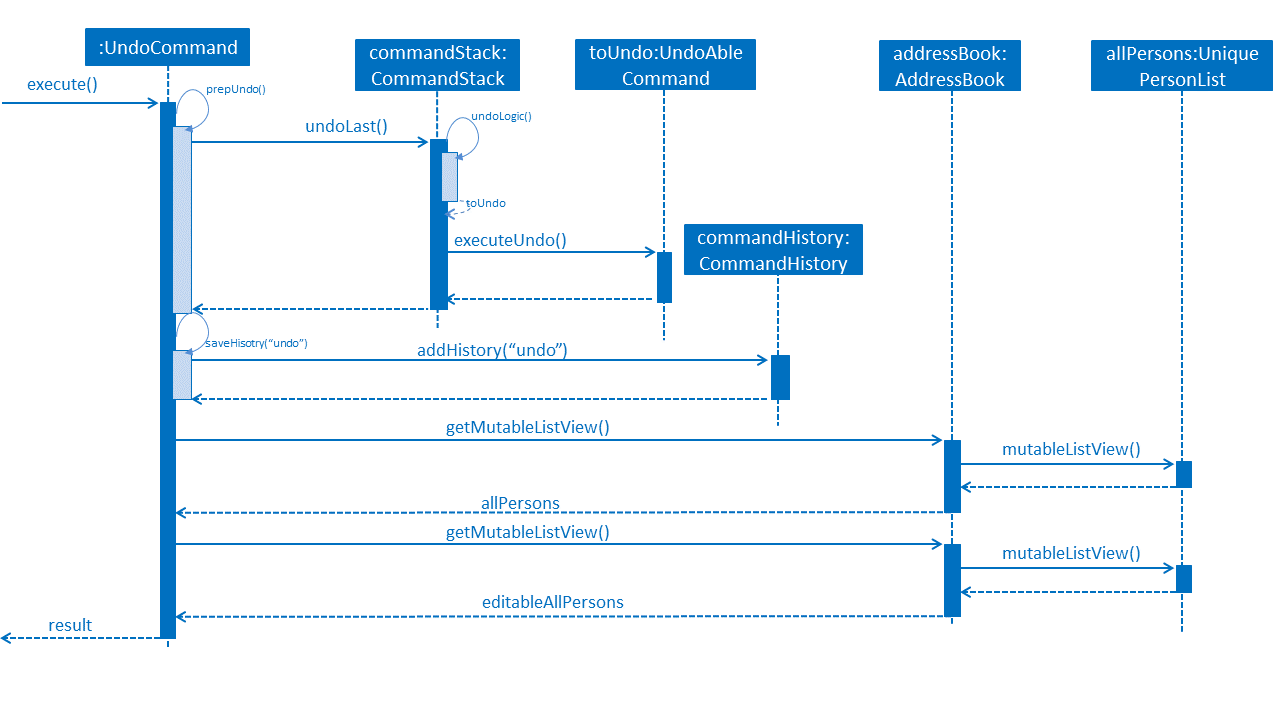
The following sequence diagram shows how the undo operation works after the command is parsed:
4.1.1 Current implementation
Current implementation requires each UndoAbleCommand object to know how to revert their own changes.This will use less memory as minimal data is stored. For example, for add, only the person added will be saved. However, we must ensure that the implementation of each individual command are correct.
4.1.3 Alternative consideration
An alternative to the current implementation is to save the different states of the MediBook after each command and iterate through them whenever undo/redo is called. Though this is far less challenging than the current implementation, performance issues might arise due to the high memory usage required.
4.2 Login System and Access Level
Securely logs user on to MediBook with a preassigned access level.
4.2.1 Current Implementation
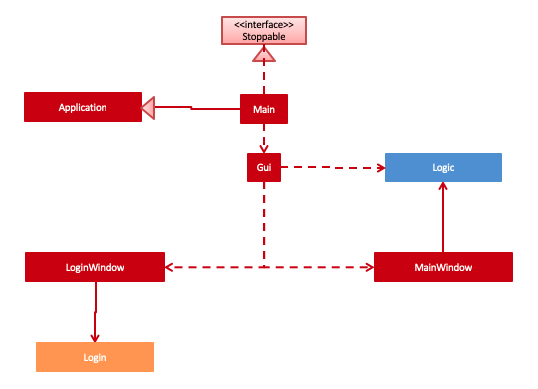
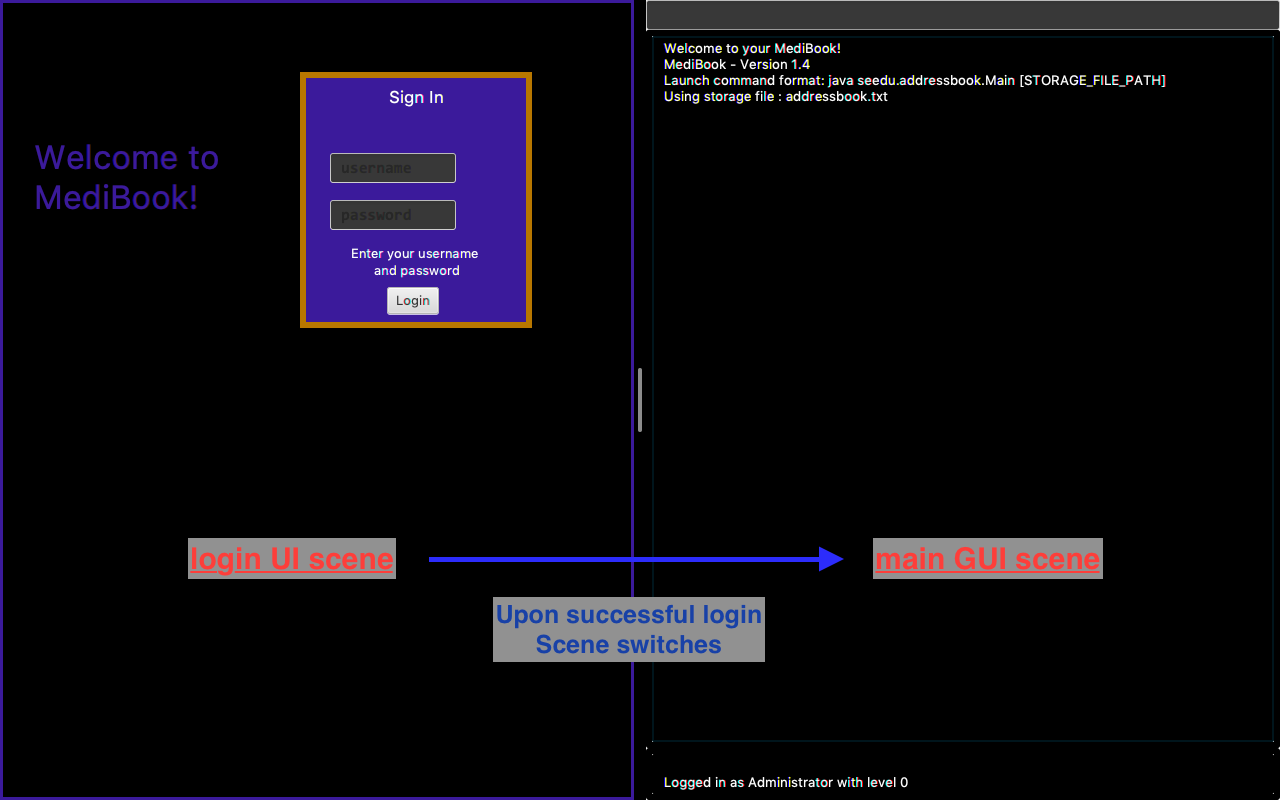
Login is implemented as a User Interface(UI) before the main Graphic UI(GUI) launches. The login UI and main GUI are two different scenes. Upon the launch of MediBook, the scene is set to the login UI and MediBook prompts for two input from the User, username and password. MediBook then compares the given pair of inputs with the data in the file loginstorage.txt. On successful login, the scene will switch from login UI to the main GUI scene.
Similar to the main GUI, login UI uses JavaFX with the file, signin.fxml, and its controller class, LoginWindow. LoginWindow class handles the getting of user inputs (i.e. Username and Password). Additionally, LoginWindow will reject empty fields and prompt the user for non-empty inputs. These are implemented with the function tryLogin(). If valid inputs are entered by the user, LoginWindow will send the inputs to the Login component of Medibook. The Login component will return an answer in the form of a Boolean as to whether login is successful or not. The user has three tries to enter a correct set of username and password before the program exits for security reasons.
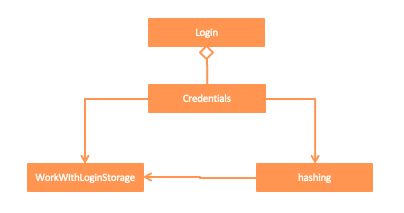
When Login component receives the input from LoginWindow, a Credentials class object with the given username and password will be instantiated in Login class. Using the methods of the Credentials class, validation of the Credentials will take place. The Credentials are passed through the WorkWithLoginStorage class which will retrieve data from loginstorage.txt and comapre it with the input. loginstorage.txt stores the username of all users and the hashes of their passwords and their respective access levels. WorkWithLoginStorage class iterates through loginstorage.txt to find the matching username, and the corresponding hashed password. The password input is then hashed using Java’s SHA-512 hashing algorithm and the result is compared with the hashed password stored in loginstorage.txt. If both matches then a Boolean true will be returned and a Boolean false if otherwise.
4.2.2 Reason for Implementation
A different UI scene is used for login so as to allow main GUI to be more isolated. Should the User fail to log in, access to Medibook must and will be denied. Thus login is implemented before the main GUI. As login UI and main GUI will never need to be concurrent, two separate scenes and switching from login UI to main GUI can be used.
To ensure a secure MediBook, user login profiles must be stored securely. Storing the hash result instead of the password ensures that should loginstorage.txt be compromised, the actual passwords are still unknown to the perpetrators. This is due to hashes being one-way. It is almost impossible for people to get back the actual password with a hash. Also, two similar passwords (e.g. Password123! and Password124!) will result in a completely different hash making it even harder for hackers to work out the actual password based on the hashes.
4.2.3 Future/Alternative Implementation
An alternative implementation, Java Authentication and Authorisation System (JAAS), was also considered when deciding on how to implement MediBook’s login system. However, using JAAS is more restrictive than the current implementation which allows for easy change in hashing algorithms used and different security features in the future. JAAS is also harder to implement and as MediBook is currently targeted at about 1000 users, there is no need to use JAAS. In the future, a salt will be used to safeguard against rainbow table attacks where hackers compare the hashes from loginstorage.txt with their own table of hashes of all different combinations of passwords.
4.3 Record Appointments
Record Appointment feature allows appointments to be stored in MediBook.
When adding a person, MediBook recognises an appointment with the tag 'd/' and in the form DD-MM-YYY-HH:MM, where the year should be in the 20th or 21th Century and time in 24-hour clock format.
DD-MM-YYY-HH:MM indicates the day and the starting time of the appointment.
Edit-Appointment Mode:
Users can enter edit-appointment mode by entering the edit-appointment INDEX where index refers to the person with that index number shown in the most recent listing.
Once in edit-appointment mode, users can add multiple appointments, delete multiple appointments and list the appointments of the chosen person
before exiting edit-appointment mode using done. A help summary of the edit-appointment mode is also available.
The following is a summary of the commands involved in edit-appointment:
-
edit-appointment INDEX -
add DD-MM-YYYY-HH:MM… -
delete DD-MM-YYYY-HH:MM… -
list -
help -
done
4.3.1 Current Implementation
Every appointment is an object of the Schedule class. Each Person has a hashset of Schedule objects. This allows each Person to have zero to multiple Schedules. Furthermore, due to the property of hashset, there would be no duplicated appointments.
Appointments are verified though the strict Schedule class which sets a regular expression (regex) that only accept valid appointments in the DD-MM-YYYY-HH:MM format. Non-existent dates, such as 30-02-2019-13:00 or 28-28-2019-15:00, and time, like 01-01-2019-25:80, would not be accepted.
Entering Edit-Appointment Mode: (And Exiting)
As shown in the sequence diagram below, when the edit-appointment command is instantiated, the index input is used to identify the Person in the list to edit appointment.
Afterwards, when it execute(), a static boolean in the Command class is set to true via SetEditingAppointmentState() to indicate that the user is now in edit-appointment mode.
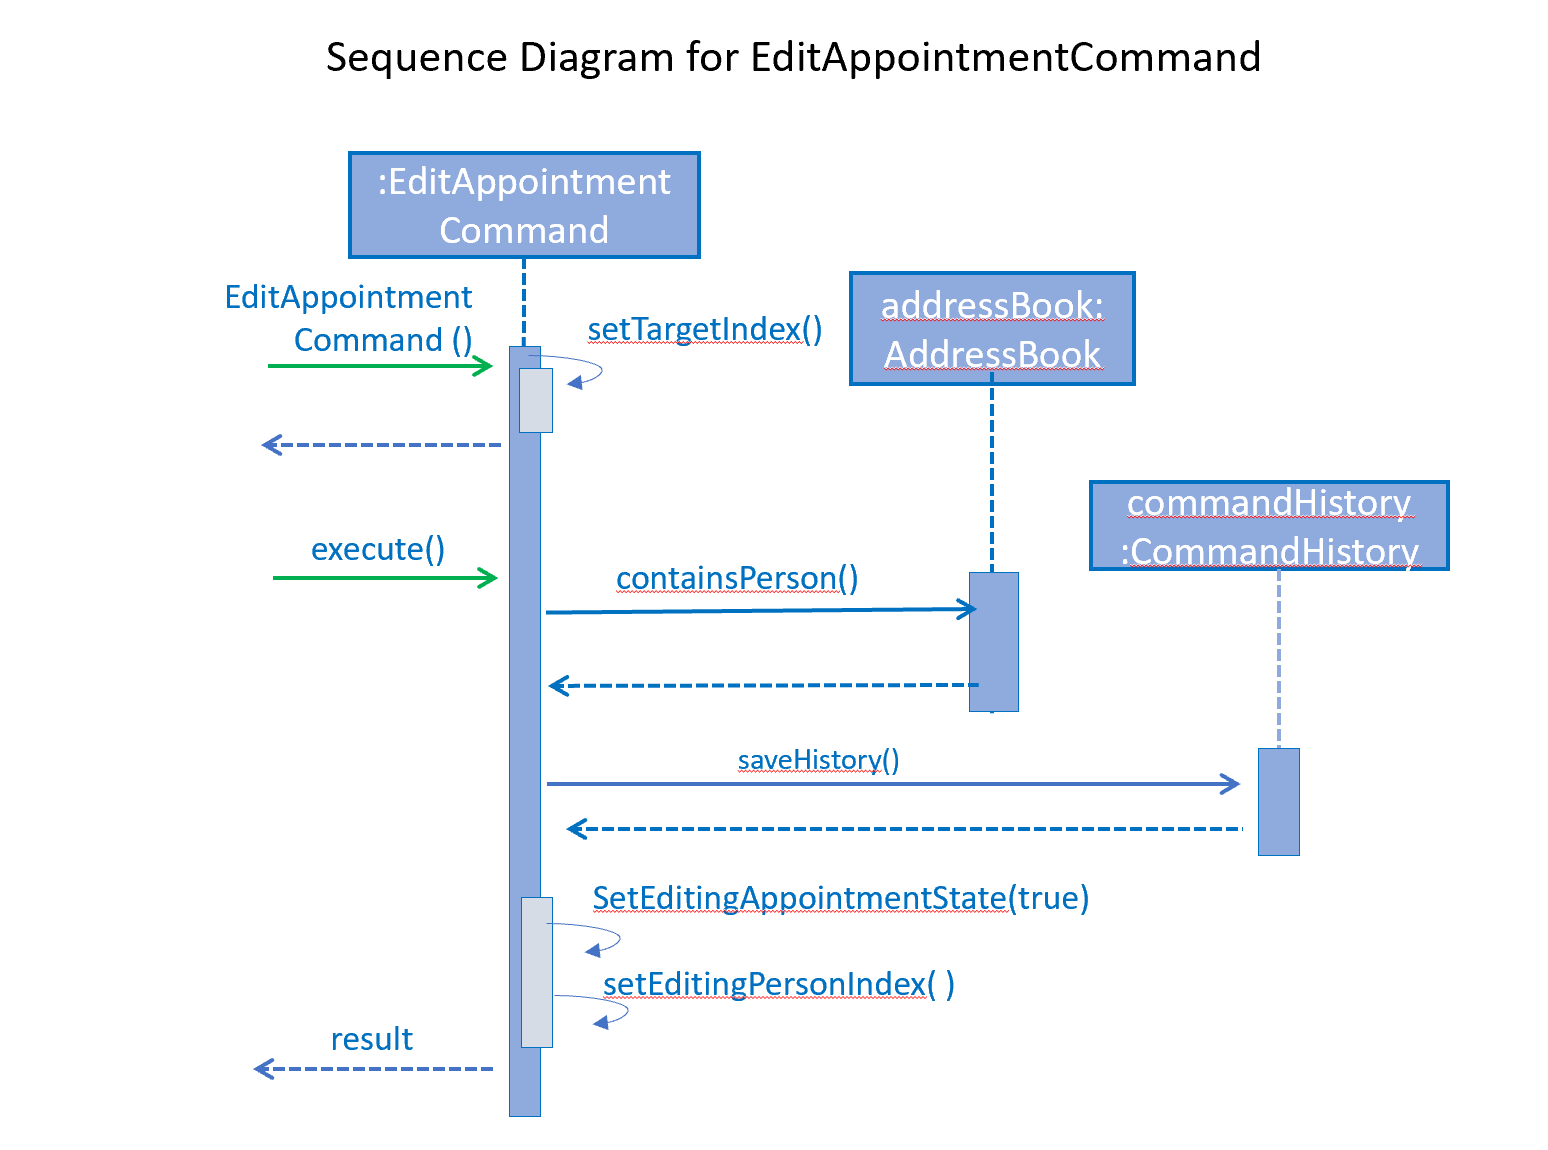
Subsequently, when commands are made, the Parser check them against the edit-appointment mode commands and execute accordingly.
This only stops when the user exits edit-appointment mode using the command done. ExitAppointmentCommand would set the static boolean in Command class back to false
using SetEditingAppoinmentState(false).
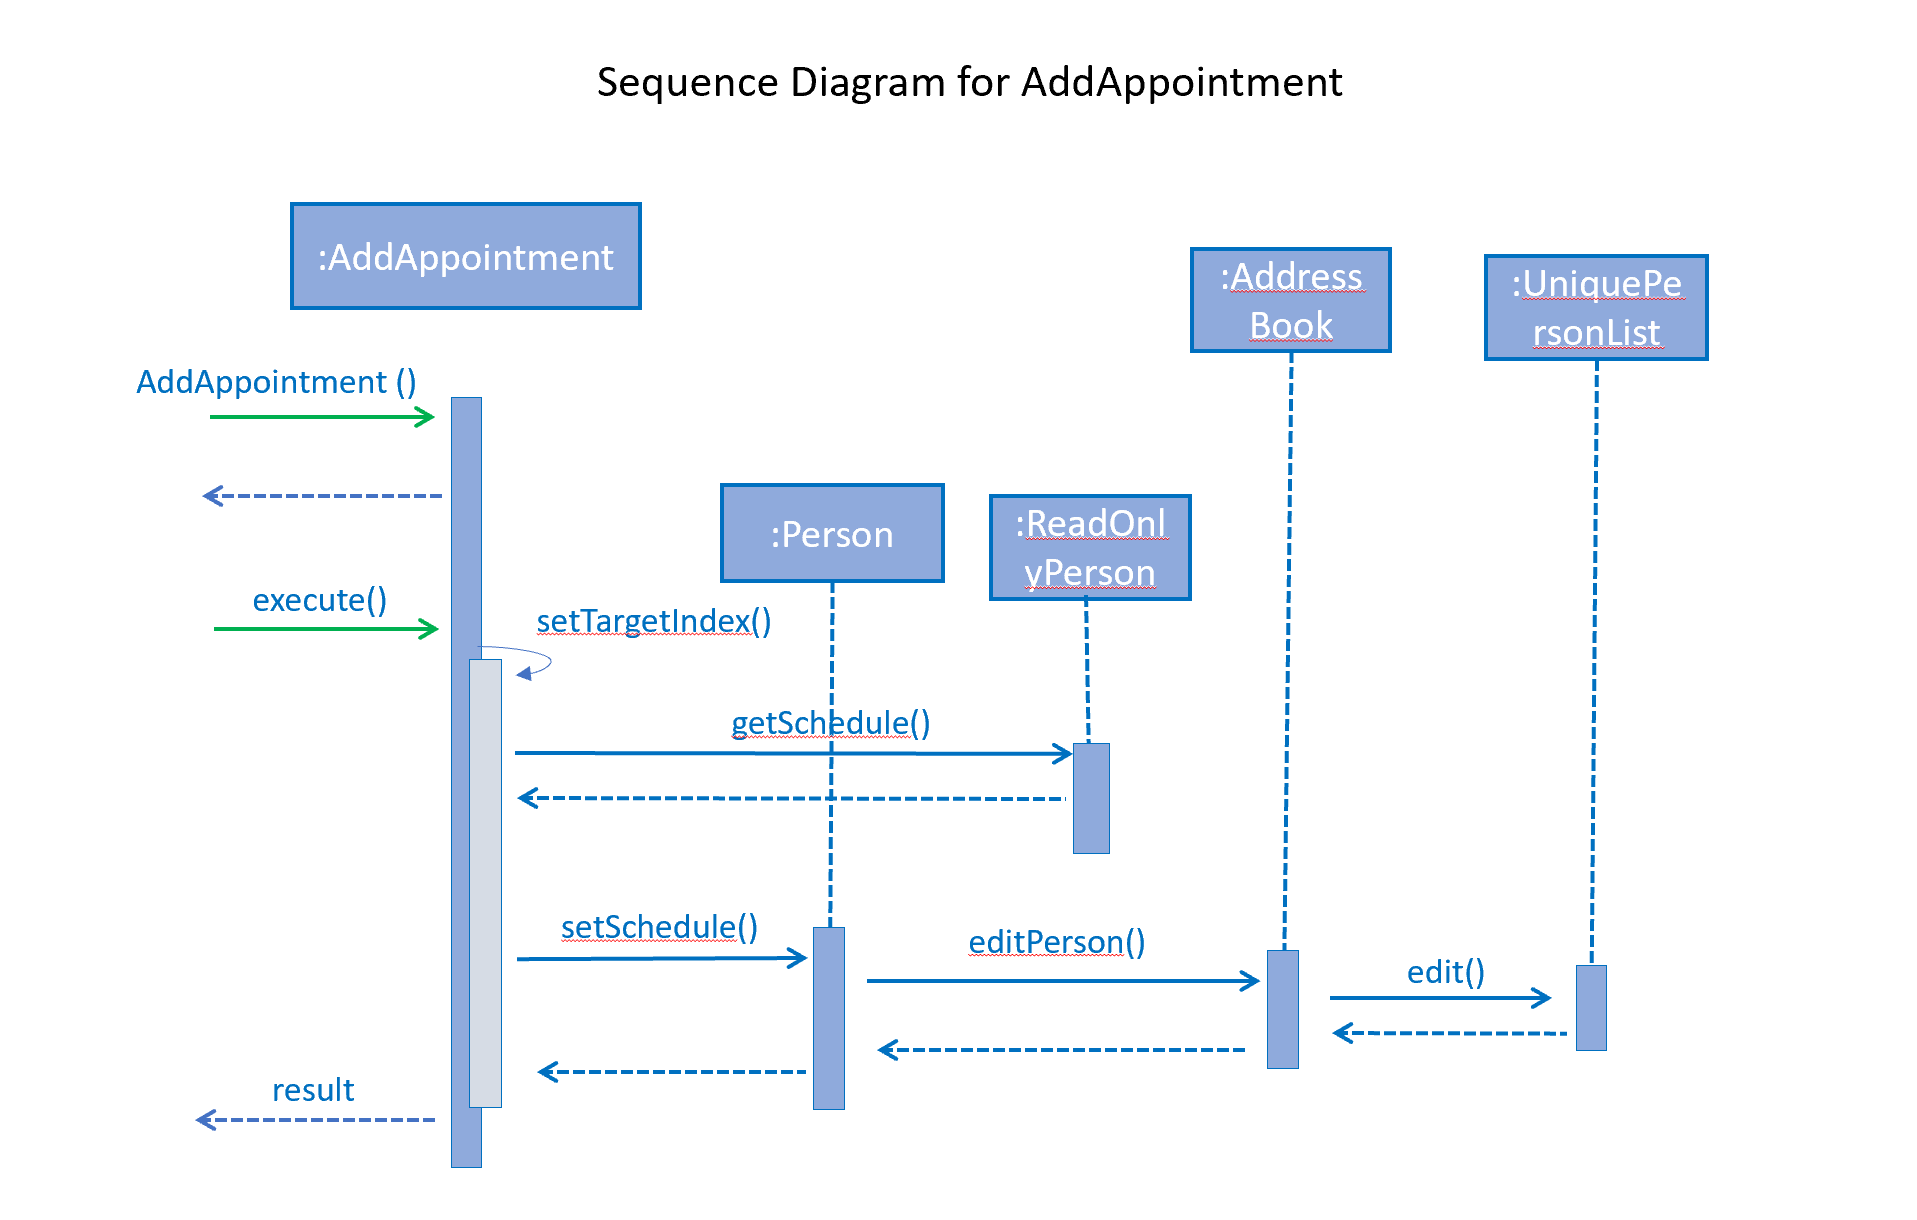
Add Appoinments in Edit-Appointment Mode:
When AddAppoinment is instantiated, it converts and stores the hashset of Schedule appointments.
As shown in the sequence diagram below, in execute(), a Person copy of the original index person is made and updated with the latest schedule. editPerson() is used to replace the Person in the UniquePersonList of people in the AddressBook. Delete is also done in the similar manner.
4.3.2 Reason for Implementation
Every time a command that takes effect on a single Person is called, AddressBook level 3 requires users to indicated the index of the Person.
Hence, I wanted to enter a mode for edit-appointment as it breaks down a very long input into multiple shorter ones. This makes easier and more intuitive for users, especially as patients would have multiple appointments made in one go or seek to make changes to their appointments.
4.3.3 Alternative Consideration
In future versions, the following details can be implemented for a better appointment feature for MediBook.
-
Use Calendar class in java.util. This allows precise date and time to be recorded, easier comparision between appointments and current date and time can be obtained. This class also provides additional fields and methods for implementing a concrete calendar system outside the package.
-
Organise the appointments in chronological order. Possible methods of achieving are to use a TreeSet instead of Hashset and to use the Calender Class mentioned.
-
A command feature to list all the appointments in a chronological order following the reference date.
-
A command feature for doctor to view their respective patients' appointments for the day or for specific days.
4.4 Data Organisation
Sorts entries in MediBook according to alphabetical order
4.4.1 Current Implementation
When the sortname command is entered, the integrated sort function is called on the list of persons from UniquePersonList, using alphabetical order as the comparator. When the sorttitle command is entered, Medibook entries are sorted according to alphabetical order within their sorted title.
The sort command does not access the stored data directly.
4.4.2 Reason for Implementation
The sort feature provides an avenue for users to view their MediBook entries in an organised manner and allows them to find their patient/colleague in a shorter time should they ever forget their name entirely (hence be unable to use the find feature).
4.4.3 Future/Alternative Implementation
In the future, the sort feature can be further enhanced in the following ways.
-
Sort according to appointment date with earliest appointment first
4.5 Association
The association feature allows users to associate a doctor together with a patient via the link and unlink command, as well as view the persons who are associated via the associatelist command. This segment will elaborate on the implementation of this feature.
4.5.1 Current Implementation
The association feature is implemented as a Set of Associated objects. The associated object will hold a String which contains the name and nric of the person that is associated.
4.5.2 Reason for Implementation
This implementation is basically storing a String of an associated person’s name and their nric into a set, which is simple to implement. However, since this implementation only stores a set of string, theres is nothing much you can do with it other than viewing it.
4.5.3 Alternative Implementation
An alternative implementation is to store the associated person object instead of just a String of their name and nric. This allows us to directly interact with the list generated by associatelist like how the we interact with list and find. However, this requires saving/loading the persn object to/from a String since the data is stored in addressbook.txt, which can be rather challenging.
5.Testing
Testing MediBook is important as it verifies that MediBook is functioning and up-to-date. This can be done so by going into IntelliJ, right-click on the test folder and choose Run 'All Tests'.
Appendix A: User Stories
Priorities: High (must have) - * * *, Medium (nice to have) - * *, Low (unlikely to have) - *
| Priority | As a … | I want to … | So that I can… |
|---|---|---|---|
|
new user |
see usage instructions |
refer to instructions when I forget how to use the App |
|
user |
my account to only be accessed by me |
ensure my information and schedule is only edited by myself |
|
user |
To be able to update or recover my password |
Access my account even if I forgot my password and keep my credentials secure |
|
user |
add a new person |
|
|
user |
delete a person |
remove entries that I no longer need |
|
user |
add in appointments dates easily |
|
|
user |
delete appointments |
remove appoinment entries that I no longer need |
|
user |
find a person by name |
locate details of persons without having to go through the entire list |
|
user |
undo/redo changes made |
revert changes that are unwanted |
|
user |
organise many persons in MediBook |
sort persons by name |
locate a person easily |
|
user |
hide private contact details by default |
minimize chance of someone else seeing them by accident |
|
user |
see history of commands made |
Appendix B: Use Cases
(For all use cases below, the System is the MediBook and the Actor is the user, unless specified otherwise)
Use case: UC01 - Login
MSS
-
User opens up MediBook
-
MediBook prompts for user to enter Username and Password
-
User keys in Username and Password
-
Login is successful, program continues.
-
Use case ends.
Extensions
-
3a. Given set of Username and Password do not match any records
-
3a1 MediBook requests for Username and Password again
-
3a2 User keys in Username and Password
-
3a3 Correct Username and Password is entered, use case resumes from step 4
-
Steps 3a1 - 3a2 are repeated for a maximum of two times or until a matching set of Username and Password is entered
-
If Username and Password still incorrect, program terminates
Use case ends.
-
Use case: UC02 - Determine Access Level
MSS
-
User logs in to MediBook (UC01)
-
MediBook will look up the corresponding access level of User
-
Based on the designated access level of the User, various viewing and editing rights will be handed to User
Use case ends.
Use case: UC03 - Information Confidentiality
MSS
-
User logs in to MediBook (UC01)
-
MediBook determines access level of User (UC02)
-
MediBook will display information that User has access to and hide information that is beyond User’s access level
Use case ends.
Use case: UC04 - Delete person
MSS
-
User requests to list persons
-
MediBook shows a list of persons
-
User requests to delete a specific person in the list
-
MediBook deletes the person.
Use case ends.
Extensions
-
2a. The list is empty.
Use case ends.
-
3a. The given index is invalid.
-
3a1. MediBook shows an error message.
Use case resumes at step 2.
-
Use case: UC05 - Undo/Redo
MSS
-
User requests to list persons
-
MediBook shows a list of persons
-
User requests to delete a specific person in the list
-
MediBook deletes the person.
-
User realise it was a mistake and request an undo.
-
MediBook undo the delete.
-
User realise it was actually not a mistake and request a redo.
-
MediBook redo the delete.
Use case ends.
Extensions
-
2a. The list is empty.
Use case ends.
-
3a. The given index is invalid.
-
3a1. MediBook shows an error message.
Use case resumes at step 2.
-
Use case: UC06 - Editing Appointment of Existing Users
MSS
-
Users
list -
MediBook will display the list of People in MediBook
-
Users select person to
edit-appointment -
MediBook enters edit-appointment mode
-
User add appointments input
-
MediBook adds in the appointments for the indicted person and does not add in duplicated appointments
-
User exits edit-appointment mode using
done -
MediBook exits edit-appointment mode
Use case ends.
Extensions
-
2a. The list is empty.
Use case ends.
Extensions
-
5a. User delete appointments input
-
5a1. MediBook delete in the appointments for the indicted person and does not change the missing appointments
Use case ends.
-
Appendix C: Non Functional Requirements
-
Should work on any mainstream OS as long as it has Java 9 or higher installed.
-
Should be able to hold up to 1000 persons.
-
Should come with automated unit tests and open source code.
-
Should favor DOS style commands over Unix-style commands.
Manual Testing
-
Undo/Redo:
-
Can be tested by entering a command that changes the data in MediBook (e.g
add,delete, etc) followed by anundoand thenredo.
-
-
Association:
-
Can be tested by using
listand thenlink INDEX1 INDEX2where INDEX1 and INDEX2 represents two people in the list with different title. After which, by doing aassociatelist INDEX1you should see that the name and nric of the person in INDEX2 appears in the associates list. -
Following that, doing
unlink INDEX1 INDEX2followed byassociatelist INDEX1and you should see that the association you have created is removed.
-